IT-mind |

- Aaron Aziz naik angin
- Mati berdiri dihimpit lori
- Saintis Telah klonkan anak kambing Kashmir
- Jangan salahkan ibu Dirang
- Anak tembak diri sendiri ketika ayah Sedang isi minyak
- Ayah Gigit Cuping Telinga Jurulatih
- Video Ciuman 2 Artis Korea Bikin Fans Marah
- Lelaki Ini Nikahi Boneka
- Ahli AKB48 Nyaris Saling Berciuman di Iklan Baru
- Jennifer Lopez Ada Kembar Lelaki ?
- if statements | Tutorial
- for loops | Tutorial
- Arrays in Java : sorting | Tutorial
- More on Java arrays | Tutorial
- Java Objects | Tutorial
- Arrays in Java | Tutorial
- Combining conditions: logical operators
- Using if ... else | Tutorial
- Nested for loops | Tutorial
- Java programming : variables | Tutorial
- Adding your first line of Java code | Tutorial
- Getting started with Java in NetBeans | Tutorial
- Java programming for beginners | Tutorial
- Getting started with Java | Tutorial
- THE MUPPETS | 2011 | BluRay
| Posted: 15 Mar 2012 10:33 PM PDT  PETALING JAYA: "Memang saya marah dengan perbuatan lelaki ini dan tidak akan teragak-agak membuat laporan polis," kata pelakon, Aaron Aziz, selepas mendapati ada individu menyamar sebagai pembantu peribadinya dan menjual iPad menerusi akaun facebook yang menggunakan namanya. PETALING JAYA: "Memang saya marah dengan perbuatan lelaki ini dan tidak akan teragak-agak membuat laporan polis," kata pelakon, Aaron Aziz, selepas mendapati ada individu menyamar sebagai pembantu peribadinya dan menjual iPad menerusi akaun facebook yang menggunakan namanya. Aaron atau nama sebenarnya Aaron Mustapha Aziz, 36, berkata, dia juga merancang menfailkan saman terhadap lelaki terbabit yang turut membuka akaun facebook palsu atas namanya dan menggunakan laman itu untuk memperdaya peminat serta menggelapkan wang mereka. Menurutnya, dia mengesan perbuatan individu terbabit yang mendakwanya menjual 50 unit iPad pada harga murah khas untuk peminat dan mereka yang berminat dengan tawaran itu perlu meninggalkan nama dan nombor telefon dalam peti masuk pesanan selepas diberitahu isterinya, Diyana Halik, 27, kelmarin. "Isteri saya memaklumkan ada seorang wanita menghubunginya pagi semalam (kelmarin) dan memberitahu menjadi mangsa penipuan lelaki yang menyamar sebagai pembantu peribadi saya dan menjual iPad di laman facebook," katanya ketika dihubungi, semalam. Aaron berkata, dia terkejut kerana tidak sangka ada individu menyamar sebagai pembantu peribadinya dan kononnya menjual iPad bagi pihak dirinya. sumber : myMetro
| ||||||||||||||
| Posted: 15 Mar 2012 10:29 PM PDT
KUALA LIPIS: Akibat dipercayai gagal menarik brek tangan, seorang pemandu lori hantu terpaksa menempuh azab hampir setengah jam sebelum disahkan meninggal dunia apabila tersepit antara pintu lorinya dengan sebatang pokok sawit dalam kejadian di Ladang Sungai Kelembung, Jalan Felda Telang Satu, di sini, kelmarin. Dalam kejadian pada jam 2.20 petang itu, mangsa, Lau Hon Yong, 53, dari Mantin, Negeri Sembilan menemui ajal di tempat kejadian selepas kepala dan perutnya tersepit. Difahamkan, ketika kejadian, mangsa sedang membaiki kerosakan kenderaan berat berkenaan tanpa menyedari lori itu bergerak sendiri secara perlahan dan hanya terhenti selepas menghimpit mangsa yang ketika itu tersandar di batang pokok sawit berdekatan. Ketua Polis Daerah, Superintendan Abdul Razak Hassan berkata, siasatan awal mendapati kejadian itu disedari pekerja ladang yang mendengar jeritan mangsa sebelum menghubungi Balai Polis Trafik Lipis. Menurutnya, sepasukan anggota polis dengan bantuan orang awam mengambil masa 15 minit untuk mengeluarkan mangsa yang tersepit antara pintu lori dengan pokok sawit berkenaan. sumber : myMetro
| ||||||||||||||
| Saintis Telah klonkan anak kambing Kashmir Posted: 15 Mar 2012 10:24 PM PDT  SRINAGAR, India - Sekumpulan saintis di wilayah Kashmir yang dikuasai India telah mengklonkan seekor anak kambing Kashmir dengan tujuan untuk meningkatkan bilangan haiwan yang sukar ditemui itu. Kambing Kashmir hidup di beberapa bahagian Banjaran Himalaya dan dataran Tibet. Bulu kambing itu yang dinamakan bulu pashmina digunakan untuk membuat baju panas Kashmir. Mengulas tentang kejayaan projek tersebut, seorang saintis, Riaz Ahmad Shah berkata, klon seekor anak kambing Kashmir betina yang lahir pada 9 Mac lalu itu akan membolehkan program pembiakan kambing berkenaan dilakukan di beberapa kawasan lain di Banjaran Himalaya bagi tujuan komersial. Menurutnya, klon anak kambing betina itu dinamakan Noori yang bermaksud cahaya. Pasukan saintis yang diketuai oleh Riaz di Universiti Sher-i-Kashmir mengambil masa selama dua tahun untuk menghasilkan klon kambing tersebut. - Agensi sumber : kosmo online
| ||||||||||||||
| Posted: 15 Mar 2012 10:20 PM PDT
PASIR GUDANG – Mangsa bunuh dan bakar, Nurul Nadirah Abdullah, 5, tidak pernah bersendirian ke kedai runcit atau ke taman permainan di Flat Seri Delima Bandar Seri Alam, di sini, kecuali pada hari kejadian itu. Peniaga, Anisah Kalam, 35, berkata, dalam sehari mesti dua atau tiga kali mangsa, yang lebih mesra dipanggil Dirang, pergi ke kedai runcitnya, tetapi bersama abang atau ibu saudaranya. Anisah yang sudah berniaga di flat itu enam tahun berkata, Dirang juga tidak keseorangan ketika bermain di taman permainan berhampiran rumahnya. "Saya minta tolong janganlah salahkan ibunya (Roselyn Alan) kerana sepanjang berniaga di sini Dirang tidak pernah (dibiarkan) bersendirian membeli gula-gula atau barang pesanan ibunya," katanya kepada Sinar Harian, di sini, semalam. Anisah berkata, Walaupun Dirang baru berumur lima tahun, kanak-kanak itu petah bercakap dan mesra dengan semua orang sehingga keletahnya diingati penduduk flat itu. Menurutnya, Dirang tidak pergi ke kedainya tiga hari sebelum itu. "Pada hari itu saya pelik lihat Dirang sendirian ke kedai, malah baki wang 20 sen selepas membeli dua bungkus mi segera dan lima biji telur tidak dibelanjakan untuk membeli gula-gula seperti biasa." "Keletahnya seperti biasa yang gemar memberi salam sebelum masuk ke kedai. Saya juga suka mengusik dia kerana petah bercakap walaupun baru berusia lima tahun," sumber : sinar harian
| ||||||||||||||
| Anak tembak diri sendiri ketika ayah Sedang isi minyak Posted: 15 Mar 2012 10:15 PM PDT  Anak laki-laki berusia tiga tahun itu ditinggalkan di dalam kereta bersama dengan adik perempuannya yang masih bayi di Washington, Amerika Syarikat. Sementara sang ayah keluar dari kereta untuk mengisi minyak dan sang ibu pergi berbelanja di pasaraya yang masih berada di kawasan pam minyak itu. Anak laki-laki itu tiba-tiba saja menemukan pistol milik sang ayah yang dengan mudah boleh dijangkaunya. Tidak lama setelah bermain-main dengan pistol milik ayahnya, anak laki-laki itu pun mengarahkan pistol ke kepalanya dan langsung menarik pemetik. "Ini adalah kejadian luar biasa tragik. Orang tua kedua anak ini telah melakukan tindakan kecuaian," ujar salah seorang petugas polis Naveed Benjamin seperti dikutip Emirates247 Khamis, (15/3/2012). Ditambahkan Benjamin, polis setempat telah mengajukan beberapa pertanyaan terkait dengan insiden yang disebabkan kecuaian sang ayah tersebut. Insiden ini merupakan yang ketiga kalinya terjadi di Washington. Sebelumnya seorang anak perempuan berusia tujuh tahun dilaporkan tewas ketika saudaranya menemukan sebuah pistol dan menembak dirinya. Insiden penembakan terakhir terjadi pada 22 Februari lalu dimana seorang anak perempuan berusia lapan tahun terluka parah saat salah seorang temannya mengeluarkan pistol dan tanpa sengaja menembak dirinya. Sumber
| ||||||||||||||
| Ayah Gigit Cuping Telinga Jurulatih Posted: 15 Mar 2012 10:12 PM PDT
Serangan itu terjadi selepas perlawanan di Holy Name School di Springfield, stesen TV WWLP melaporkan. Setelahpasukan putranya yang duduk di kelas 6 SD kalah di final, Timothy Lee Forbes menyerang jurulatih pasukan pemenang, dan menggigit telinganya, kata asisten jaksa Marie Angers. Beberapa anak-anak berusia 10-12 tahun, yang telah berkumpul untuk berjabat tangan, menangis setelah kejadian. Penonton lain kemudian menarik Forbes. Sang pelatih segera dilarikan ke hospital untuk menjalani serangkaian operasi penyambungan kembali telinganya. Setelah menjalani perawatan di Baystate Medical Center, pelatih yang namanya dirahsiakan itu kembali ke rumah, menurut NBCConnecticut.com. Western Massachusetts CYO Basketball League dalam siaran menyatakan "terkejut oleh tindakan terhadap salah seorang jurulatih kami yang paling berdedikasi" dan bahawa insiden itu pertama kali terjadi dalam sejarah liga. Forbes, 34, menyerahkan diri kepada pihak berwajib di pengadilan Springfield. Dia mengaku bersalah atas perilaku tidak tertib dan penyerangan. Ia menghadapi sidang minggu ini. Pengacaranya Philip Lauro mengatakan kliennya tidak memiliki catatan kriminal sebelumnya. Sumber
| ||||||||||||||
| Video Ciuman 2 Artis Korea Bikin Fans Marah Posted: 15 Mar 2012 10:07 PM PDT
Rakaman itu sebetulnya merupakan potongan gambar acara "Inkigayo" yang ditayangkan SBS. IU yang membawakan acara tersebut menceritakan jenis lelaki idealnya kepada Taeyang yang menjadi bintang tamu. Seperti dikutip Allkpop, kemudian IU bertanya kepada Taeyang, "Siapa yang akan kamu beri hadiah untuk White Day nanti?" Pertanyaan IU direspons meriah oleh personel Big Bang yang lain. Mereka berteriak, "Cium, cium, cium!" Tanpa diduga, Taeyang kemudian memeluk penyanyi muda tersebut dengan sepenuh hati. IU yang mendadak dipeluk nampak sedikit terkejut. Namun, dia berhasil menguasai keadaan dan kemudian tersenyum bahagia. Tak cuma itu, di akhir acara, saat mereka membawakan lagu "I Need A Girl" di atas pentas, IU gantian buat Taeyang terkejut. Dengan penuh semangat, dia mencium pipi Taeyang. Aksi peluk cium itu rupanya bikin penggemar keduanya benci dan cemburu. "Kalian berdua, stop!" seru seorang penggemar dalam komennya di media sosial. "Apakah hubungan mereka akan benar-benar menjadi hubungan yang real?" komen fans yang lain, khuatir. Sumber
| ||||||||||||||
| Posted: 15 Mar 2012 10:02 PM PDT
Keputusan ini bermula dari hobinya mengoleksi boneka mannequin sejak tahun 2000. Everard selalu mengagumi kecantikan boneka-boneka plastik yang dibuat dengan wajah dan tubuh persis manusia asli. Bagi Everard, inilah contoh nyata dari konsep life-imitating art atau seni yang menyerupai kehidupan nyata. Everard jatuh cinta pada mannequin kerana kecantikannya berbeza dari para wanita di dunia nyata yang selalu ingin berdandan seperti boneka. Keinginan para wanita untuk tampil seperti boneka menghasilkan konsep art-imitating life atau kehidupan yang meniru karya seni. Menurut Everard, konsep ini membentuk peribadi yang palsu. Keputusan ini diambil selain kerana Everard jatuh cinta pada Caroline, dia juga khuatir akan timbulnya konflik yang berujung pada perceraian jika menikah dengan manusia. Everard juga mengaku masih ingat rasa sakit hati yang dialaminya saat berpisah dengan kekasihnya seorang manusia. The Daily Star melaporkan, baru-baru ini Everard menikah lagi dengan sebuah mannequin berambut pirang. Pernikahan ini berlangsung di kampung halamannya, Christchurch, Dorset, lengkap dengan upacara keagamaan dan naik kereta kuda keliling kota. Sumber
| ||||||||||||||
| Ahli AKB48 Nyaris Saling Berciuman di Iklan Baru Posted: 15 Mar 2012 09:56 PM PDT  AKB48 membintangi iklan? Sudah bukan hal baru. Namun selalu saja ada hal yang menarik untuk dibicarakan pada setiap iklan yang mereka bintangi. Seperti dalam iklan gula-gula Puccho versi baru. Dalam iklan keluaran UHA Mikakuto ini masing-masing anggota saling memberikan gula-gula, tapi tidak memakai tangan. Mereka berbagi melalui mulut. Tak hairan jika mereka terlihat seperti hendak berciuman. Para anggota merasa tegang ketika menjalani shooting iklan ini. "Biasanya kami tidak pernah sedekat itu dengan wajah member lain. Makanya kami sangat gugup ketika proses shooting berlangsung," ungkap mereka seperti ditulis Tokyohive, Rabu (14/3). Anggota AKB48 mengaku kesulitan memberikan gula-gula dari mulut ke mulut tanpa melakukan kesalahan. Mereka pun berlatih dan harus take berkali-kali. Beruntung mereka memiliki teamwork yang kuat, sehingga shooting selesai dengan baik. Tags: AKB48,akb48,akb48 members,akb48 scandal,akb48 youtube,akb48 heavy rotation,akb48 give me five,akb48 anime,akb48 lyrics,akb48 beginner,akb48 discography
| ||||||||||||||
| Jennifer Lopez Ada Kembar Lelaki ? Posted: 15 Mar 2012 09:53 PM PDT  Lelaki tersebut memang memiliki gaya rambut dan juga wajah J-Lo, meski tak secantik penyanyi ini, namun lelaki tersebut cukup boleh menipu seseorang yang melihat keduanya. Dalam video klip single J-Lo yang terbaru memang terdapat beberapa adegan-adegan berat, oleh kerana itu J-Lo memerlukan seorang stuntman. Ya! lelaki yang mirip J-Lo tersebut memang bukanlah kembar J-Lo, melainkan seorang stuntman yang sengaja didandani menyerupai J-Lo. Sutradara video klip ini, Jessy Terrero, sukses memilih seorang stuntman, kerana sang lelaki ini sangat menyerupai J-Lo secara spesifik, termasuk gaya rambut.
| ||||||||||||||
| Posted: 15 Mar 2012 06:33 PM PDT On the previous page, we looked at Java for lops. The for loop is very important because it is an example of flow control: it allows our program to do something other than just "start at the beginning and blindly go to the end". Pretty much any program beyond the simple Hello World! example needs to control its flow. Another important type of flow control is the if statement. This allows us to execute a particular section (block) of code if (and only if) a particular condition is true. The if statement is important for allowing our program to make decisions. As an example, let's say that we want to print out the times tables between 2 and 12 as in our nested loops example. But let's say that we don't want to bother with the 10 times table, because that's easy. We could write two separate loops, one for tables 2-9 and one fo tables 11-12. But that would be a bit clumsy: we'd have to write twice a piece of code that essentially "does the same thing". So instead, we can introduce an if statement to print out the times table on each loop, only if the times table number isn't 10: for (int timesTableNo = 2; timesTableNo <= 12; timesTableNo++) { if (timesTableNo != 10) { System.out.println("The " + timesTableNo + " times table:"); for (int n = 1; n <= 12; n++) { int result = n * timesTableNo; System.out.println(timesTableNo + " times " + n + " = " + n); } } } Notice that the word if is followed by a condition in brackets. As with the for statement, the if statement is followed by a block inside curly braces { ... }. Remember, we said that in general, when you want several lines of code to function together as a "section" of program, you put curly braces around them. The condition itself is is not equal to, which in Java we write as !=. In the for loop, we actually saw another condition: <= meaning is less than or equal to. Here are common conditions that we can use:
For example, in a card game where we need to check if there are any cards left in the deck, we could write: if (noCardsLeft > 0) { ... give card to player ... } Next: if ... else On the next page, we look at how to use the if ... else construct to make a certain block of code run if the condition isn't true.
| ||||||||||||||
| Posted: 15 Mar 2012 06:31 PM PDT In the previous section of this Java tutorial, we intoduced the very important notion of variables. Now, with the help of variables, we're going to write a short program that uses another very important construct called a loop. A loop is essentially a section of program that repeats over and over for some given number of times, or while some given condition still holds. Specifically, we're going to look at what is generally called a for loop. This is generally a loop that repeats for all the values of a particular variable between a given range. For example, let's say we want to write a simple program that prints the 7 times table. As is customary, we'll consider displaying "7 times n", for all values of n between 1 and 12. So what we write looks something like this: for (int n = 1; n <= 12; n++) { int result = 7 * n; System.out.println("7 times " + n + " = " + result); } Hopefully the second and third lines are starting to become familiar now. These define what we do for a particular value of n: each time, we declare a variable called result, and we set it to have the value of seven times the given value of n. Then on the next line, we print out the result, along with some text. We still haven't really explained in detail this use of System.out.println(), but this and other examples we've seen are hopefully starting to give you a rough idea of how it works. Around these two lines, we have a "wrapper" that turns it into a for loop. On the first line is the actual for statement. If you look carefully, you can see that it has the following format: for ( declaration ; condition ; update action ) We can describe the three parts in more detail as follows (note that strictly speaking, all of these parts are optional, but usually, they're all included, as here):
In this case, we want to consider all the values between 1 and 12 inclusive. In order to do so, we need to keep repeating the loop as long as n is less than or equal to 12. Notice the use of <= which means this. Then, we want to add 1 to the value of n ready for the next repetition. Recall from the section onusing variables that a shorthand for adding 1 (or incrementing) is to use ++. But we could also have written n = n + 1 if we'd wanted to. The curly braces (the symbols { }) define a block. A block, sometimes called a scope block, defines a "unit of program". In this case, the block directly after the for statement defines the section of code that is to be looped. If we didn't put the braces, then Java wouldn't know which precise set of lines we wanted to repeat. (In fact, it would then assume that it was just the single line directly following the for statement that we wanted to repeat; but in general, it's good practice to put the braces, however many lines are inside them.) To understand how the loop works, it may be worth writing a list of the actions in the order they occur:
Running the times table program Once you've understood the explanation of the looping program above, you probably want to try running it. To run the program, you need to type it into the IDE (editor) you're using to work with Java. In our guide to getting started with Java and Netbeans, we showed how to add your first line of Java codeand then run the program. You need to follow that guide, putting all four lines of code in the place indicated by the red arrow, where you previously just had a line to output Hello World!. Next... On the next pages, we look at:  nested for loops: a technique of using more than one for loop for cycling over combinations of things; if statements, which allow us to introduce conditions or decisions into our program. nested for loops: a technique of using more than one for loop for cycling over combinations of things; if statements, which allow us to introduce conditions or decisions into our program.
| ||||||||||||||
| Arrays in Java : sorting | Tutorial Posted: 15 Mar 2012 06:29 PM PDT Continuing our illustration of using arrays, we look at a simple technique for sorting the random numbers in the array into ascending order. In reality, there are better ways of sorting, but the one we're going to use here has the redeeming feature of being easy to understand and only need a few lines of Java. The basic idea is as follows. Initially, the whole array is "unsorted". We loop through all the positions in the array, going from "left to right" (from zero upwards). So we set up a variable, say, i, which loops from 0 to length (or strictly, length - 1). At each position, we ask the question "what is the next-smallest number out of all those that are still unsorted"? We find that next-lowest number, and swap it with the one in position i. Then, we increase i by 1 and loop round again. At any moment in time, all of the array with positions lower than i is sorted; positions greater than i are not yet sorted, and are the ones that we need to find the next-lowest number from. First, let's define the loop over i. It'll look as follows: for (int i = 0; i < randomNumbers.length; i++) { int smallestNo = ... smallest number in the array ... with a position greater than 'i' int posWithSmallest = ... position of 'smallestNo' swap randomNumbers[i] and randomNumbers[posWithSmallest] } That's all very well, I hear you ask, but how do we change the lines inside the loop into actual Java code? How do we actually find the number in the array (from position i onwards) that has the lowest number left? Well, you may have guessed that we need to use a nested loop. That is, inside the loop we've just created step through the array, we'll create anotherloop that checks all the positions in the array between position i and the end of the array and finds which one is lowest. So the code looks as follows: for (int i = 0; i < randomNumbers.length; i++) { int smallestNo = randomNumbers[i]; int posWithSmallest = i; for (int j = i+1; j < randomNumbers.length; j++) { int val = randomNumbers[j]; if (val < smallestNo) { smallestNo = val; posWithSmallest = j; } } swap randomNumbers[i] and randomNumbers[posWithSmallest] } We start by pretending that the smallest number is the one at position i: notice the two variable declarations of smallestNo and posWithSmallest at the beginning of each pass through the i loop. Then, we go through the rest of the array from position i + 1 onwards, seeing if we can find a smaller value. If we find a smaller value (notice the comparison in the line in bold), then we set smallestNo to be that number, and also posWithSmallest to be its position. Swapping values round Finally, to swap the two numbers round— so that the smallest number from the unsorted portion of the array is put in its "rightful place"— we have to be slightly careful. What we logically want to do is as follows: randomNumbers[i] = smallestNo; randomNumbers[posWithSmallest] = randomNumbers[i]; However, there's a problem with this. In the first line, we overrite the value in position i, so that in the second line, we end up copying the new value from position i that we've just written, rather than copying the "old" value before it was overwritten. To get round this, we use what is called a temporary variable— that's just a variable that serves in a small number of lines of code: int tmp = randomNumbers[i]; randomNumbers[i] = smallestNo; randomNumbers[posWithSmallest] = tmp; Putting these three lines where we said swap ... in the code above, we you should now find that this code sorts the array. Efficiency The program we've written here works in the sense that it produces the correct result. The technique or algorithm that we used is often called a selection sort: at each position of the array, we select from the remaining unsorted values the next one in order. A problem that would often prevent the selection sort from being used in the "real world" is that it doesn't solve the problem efficiently. If you think about it, on each pass through the array, we're likely to end up comparing a lot of pairs of values that we've compared on a previous pass. There are certainly better sorting techniques that avoid this duplication of work. However, they're a bit more complicated to program, which is why we'll leave them for the time being.
| ||||||||||||||
| More on Java arrays | Tutorial Posted: 15 Mar 2012 06:28 PM PDT In the previous two sections, we looked at arrays, which are a way of setting aside a "row of pigeon holes" in memory for data, and objects, which allow us to create some piece of data in memory and tie it to the methods or routines that act on that data. As an example of an object, we looked at a random number generator class called Random, and how it has a method called nextInt() which allows us to generate random integers (whole numbers) from thatRandom object. In our example program, we printed out the random numbers that we generated. In the examples that follow, we're going to:
Putting the numbers into an array The first example is mostly a reminder of what we've seen before in our introduction to Java arrays. We declare an array of the right size to hold the random numbers we want to generate. In this case, let's say 20: int[] randomNumbers = new int[20]; Now, we create our Random object as before, and pull out random numbers from it by calling nextInt(). To put an item into the array, we have to saywhere in the array we put it— i.e. give the position or index (in effect, the "pigeon hole number" in the row of memory). So to put the numbers into consecutive positions until we've filled the array, we use a for loop: Random rand = new Random(); for (int i = 0; i < randomNumbers.length; i++) { int n = rand.nextInt(100); randomNumbers[i] = n; } Note in this case, our random numbers will be between 0 and 99 inclusive. Notice also the use of randomNumbers.length: length is a special keyword that we can use to query the length of a given array. So our loop sets i to consecutive indicies between 0 and (length - 1)— recall that array indices start at 0, so in fact our 20-position array is numbered from 0 to 19 inclusive. Now that we've filled our array with random numbers, we can print out those random numbers as follows: for (int i = 0; i < randomNumbers.length; i++) { System.out.println("Position " + i + " : " + randomNumbers[i]); } If you put the above fragments together, and run the program, you should find it outputs a list of 20 random numbers. On the next page, we look at sorting the array.
| ||||||||||||||
| Posted: 15 Mar 2012 06:23 PM PDT You've probably heard or read that Java is a so-called object-oriented language. That means that Java has some special features to allow us to organise our program and data into objects. For now, we can think of things as follows: An object is some data plus routines to manipulate that data, all packaged together. Another way of thinking about things is that an object is a "thing with properties". OK, that last point will sound either weird or a statement of the obvious, but all will hopefully become clear in a moment... To help us understand what an object is, we'll delve straight in and use one. We're going to write a program to simulate 20 dice rolls: that is, print out 20 random numbers between 1 and 6. To do so, we're going to create an object that will act as a random number generator. Once we've created it, then we will call one of its routines 20 times to generate 20 random numbers. The main part of the code looks as follows: import java.util.Random; Random ran = new Random(); for (int i = 0; i < 20; i++) { int dice = 1 + ran.nextInt(6); System.out.println(dice); } The very first line (the one that begins with the word import) goes at the top of the program file. In fact, it goes just below the line beginning with the wordpackage which most IDEs will create. The other lines go in the usual place, i.e. inside the curly braces { } after the line public static void main(String[] args) that the IDE will also have created. Some of this will hopefully be familiar, and some of it won't. You should recognise the code for a for loop . The line with System.out.println for printing something out is also hopefully familiar, even though we still haven't really explained what System.out.println actually means. Then, the first line of this code creates an object. As you can see, we use the new keyword, in a similar way to when we created an array. But this time we're creating an object1. We also have to specify the type of variable, just as before when we created variables of type int. But this time, our variable type is the type of object. The type or class of object is called Random. This is one of the many object classes built into the standard Java libraries2. (Theimport essentially tells Java that we're going to be using this class— notice that it has an extra part java.util which says which "package" or part of the libraries the class comes from.) If you imagine "creating an object" is picking up a calculator, we now want to "push some buttons" on the calculator. For this, we need to call a method. This is the part of the program that says ran.nextInt(6). Here, we're taking the object that we created and called ran, and we're calling a routine (ormethod in Java jargon) that acts on that object. Notice that the method can take a parameter— in this case 6, the maximum random value— and returns a result— in this case, the random number generated. Notice an important piece of syntax: any parameters go inside normal brackets after the method name (which is nextInt() in this case). Finally, we add 1 to the random number returned by the nextInt() method. The reason we do this is that nextInt() actually returns a number between 0 and one less than the number we supply, between 0 and 5 inclusive in this case), and to simulate a dice roll we actually need numbers between 1 and 6 inclusive. Next: more arrays Now we've introduced the very basics of objects, we're actually going to skip back to arrays temporarily, and look at some more examples of working with Java arrays. 1. Actually, a subtlety in Java is that arrays are also objects, but we'll pretend they're different things for now. Arrays are in any case "special". 2. In computing, a library is a set of "general" or "standard" routines— or, in the case of Java, classes— provided with a language, or sometimes, as an "extension" to the language.
| ||||||||||||||
| Posted: 15 Mar 2012 06:20 PM PDT In our introduction to variables, we used the analogy of pigeon holes, and said that in general, a single variable took up a "pigeon hole" of memory, and that that pigeon hole had a particular label. Sometimes, when we want to work with lists or groups of things, this notion of a single labelled pigeon hole per variable isn't very useful. For example, continuing with the idea of a card game that we've mentioned a couple of times, supposing we need to track the state of a given number of players. If we know that we have exactly two players, then to keep track of the number of cards that each player has in their hand, we could possibly declare two variables, numberOfCards1 and numberOfCards2. But the program is going to quickly get a bit awkward. Imagine that we need to find out the number of cards held by the current player. Well, we've seen that we can introduce conditions with the if statement, so we could just about write the following: int noCardsCurrentPlayer; if (currentPlayer == 1) { noCardsCurrentPlayer = noCardsPlayer1; } else if (currentPlayer == 2) { noCardsCurrentPlayer = noCardsPlayer2; } If we really had no other option, we could just about write things this way. But the program would soon get pretty ugly. Firstly, for every time we have to select a value depending on the player number, we'd need and if statement like this. And secondly, it's going to be difficult to make our program flexible— that is, essentially work with any number of players. We pretty much have to decide in advance how many players there are, and thus how many variables to declare, how many else if lines to write etc. What we'd really like to do is say "reserve a row of x pigeon holes", where x is the number of players, and which we decide at the time of running the program rather than at the time of writing it. Then, when we want to know the number of cards in a particular player's hand, that is the value of the "xth pigeon hole" in the row we reserved. Well, that's effectively what an array is. Let's assume that we have a variable, noPlayers, which holds the number of players in the current game. Now, to set aside a row of pigeon holes in memory to store the number of cards that each player has, we can write: int[] cardsPerPlayer = new int[noPlayers]; Note the addition of the square brackets [], which effectively mean "array of". At the beginning of the declaration, int[] means "array of int"— it's the type of variable that we're declaring, as before. Then in the second case, we inside the square brackets the number of ints that we want in the array: in this case, one for each player. Notice also that we've inserted the word new. We'll look in more detail at the keyword new, but it is essentially used to reserve some space in memory for something that isn't just a single, "simple" variable such as a single int. So now, to refer to a particular "pigeon hole number" in the array (in programming, we'd often talk about a particular index or position in an array), we put the number inside square brackets, such as the following to refer to the first player or position in the array: cardsPerPlayer[0] or the following to refer to the number of cards of the current player: cardsPerPlayer[currentPlayer] Notice that in fact, the positions in an array are numbered starting at zero, not 1. So in fact, if our player numbers started at 1, we'd end up writing: cardsPerPlayer[currentPlayer - 1] Using a loop, the following would print out the number of cards held by each player in turn: for (int i = 1; i <= noPlayers; i++) { int n = cardsPerPlayer[i - 1]; System.out.println("Player " + i + " has " + n + " cards"); } Notice how with this version using an array and a loop, the actual program doesn't depend on the number of players, unlike the version with the separate variables and if statements above, where we'd need to add new lines of code for each new player we added. Similarly, we can set the number of cards held by each player as follows (here, we give each player 5 cards): for (int i = 0; i < noPlayers; i++) { cardsPerPlayer[i] = 5; } Notice how in the previous example, the value of i went from 1 to the number of players inclusive, and on each pass through the loop, we subtracted one to convert this number into the array position. In this last example, we actually start counting at zero, and continue until one less than the number of players— in other words, this time, i is directly the array index and we don't need to subtract one. Why the two versions? Well, just because in the first case, we needed to display the player number as well as use it as an index. And to human beings, player numbers start at one, not zero! Of course, we could still have counted from zero, and added one to get the display number each time— in this case, as in many cases in programming, we have a choice, and neither option is necessarily preferable to the other. In the second case, we're using i purely as an array index, so we may as well start counting at zero— i.e. "speak the computer's language" rather than the user's, since the human user will never see i in this case. Next: objects We're going to come back to more examples of using arrays in a moment. But first, we'll take an excursion with our first look at objects, which will become a key concept in Java programming.
| ||||||||||||||
| Combining conditions: logical operators Posted: 15 Mar 2012 06:18 PM PDT So far, we've been using if and else with "simple" conditions. But what if we want to combine conditions? For example, we might want to give the player an extra card if there are cards left in the pack and the player has less than 5 cards in their hand. To do this, we use what are sometimes called logical operators: things like "and", "or", "not". And The and operator looks as follows: if (cardsLeftInPack > 0 && cardsInHand < 5) { ... } Note that we put two "and" symbols (&&). Or To check for one condition or the other, we use two pipe symbols. This is the vertical line that on many keyboards is obtained by holding down SHIFT and pressing the button to the left of the Z key. (On some other common layouts, you hold down CTRL and SHIFT and press the 1 key.) The code then looks as follows: if (timesTableNo != 10 || n >= 5) { System.out.println(timesTableNo + " x " + n + " ...); } Note that or means if either of the conditions is true, or if both conditions are true1. So this code would print out the line if the times table number was not 10, or if n was at least 5. In other words, it would print out the whole times table in the case of times tables other than 10, but for the 10 times table, would print out the table from 5x10 onwards. Not We can use the Java else statement to add some code to be executed when a given condition isn't met. But we can also write a condition that means "ifnot ...". The Java symbol for not in this case is the exclamation mark !. So if we want to write "if it isn't true that there are cards left in the pack and the player has fewer than 5 cards", then we can write: if (!(cardsLeftInPack > 0 && cardsInHand < 5)) { System.out.println("You can't have more cards!"); } Notice how in this case, we put extra brackets around the whole condition that we want to negate. In reality, it's often possible to avoid using !. For example, in this case, we could have written: if (cardsLeftInPack == 0 || cardsInHand >= 5)) { System.out.println("You can't have more cards!"); } Arguably, this version is a bit clearer: just as people generally have trouble interpreting sentences with too many "nots" in them2, in programming, people appear to find it harder to interpret conditions with nots in them versus equivalent conditions without them. Next: arrays On the next page, we look at arrays in Java, which allow us to deal with a "row of pigeon holes" rather than singly labelled variables. 1. If you need the notion of either but not both, there exists the "hat" operator ^, but in reality it is rarely used. 2. People often have trouble deciding between sentences such as No program is too trivial to debug vs No program is too trivial not to debug. In other words, we often have trouble "getting the right combination of nots". In human language, we can cope with this illogicality most of the time, but in computer programming, your lines of code will be interpreted literally!
| ||||||||||||||
| Posted: 15 Mar 2012 06:17 PM PDT On the previous page, we looked at the Java if statement, which can be used to make a "decision" in our program, executing a block of code if and only if a particular condition is true. But what if it isn't true? In this case, we can use the else keyword to define another block of code to be run if the condition isn't true. The general pattern is: if (condition) { ... code to run if condition true ... } else { ... code to run if condition false ... } For example, in our program to print out all times tables except the 10 times table, we could write the following, which will print out a message telling the user why the 10 times table isn't being printed: if (timesTableNo != 10) { System.out.println("The " + timesTableNo + " times table:"); for (int n = 1; n <= 12; n++) { int result = n * timesTableNo; System.out.println(timesTableNo + " times " + n + " = " + n); } } else { System.out.println("Not printing " + timesTableNo + " times table because it's easy!"); } Notice that we could equally have written the above code the other way round, as follows: if (timesTableNo == 10) { System.out.println("Not printing " + timesTableNo + " times table because it's easy!"); } else { ... print times table ... } Deciding which way round to write things is sometimes a question of preference, or deciding which way round best reflects our "thought process". In this case, I would prefer the first way round, because the thing we basically want our program to do is "print all the times tables except 10". It arguably helps us to read our program if we put the "thing that we basically want to do" inside the main condition. Next: combining conditions On the next page, we look at how to combine several conditions using what are sometimes called logical operators.
| ||||||||||||||
| Posted: 15 Mar 2012 06:16 PM PDT On the previous page, we saw how to create a for loop in Java. This is generally where a single variable cycles over a range of values. Very often, it's useful to cycle through combinations of two or more variables. For example, we printed out a single times table, but what if we wanted to print out all the times tables, say, between 2 and 12? One common way to do this is to use a nested loop. That's just a fancy way of saying one loop inside another. So we start with one loop, which goes through all the "times table numbers" in turn that we want to print (in this case, we said between 2 and 12): for (int timesTableNo = 2; timesTableNo <= 12; timesTableNo++) { } Then, inside this loop, we place our other loop that printed the 7 times table. Only this time, we don't want it to print the 7 times table each time— we want it to print the timesTableNo times table each time. So the program looks like this: for (int timesTableNo = 2; timesTableNo <= 12; timesTableNo++) { System.out.println("The " + timesTableNo + " times table:"); for (int n = 1; n <= 12; n++) { int result = n * timesTableNo; System.out.println(timesTableNo + " times " + n + " equals " + n); } } Now, the lines in bold will be run for all combinations of times table number and n. Notice that each times table is also preceded by a "heading" that announces it as "The 2 times table" etc. The line to do that sits only inside the timesTableNo loop, so it only gets run once for every times table, not once for every combination. Try running the program and confirming that it prints all the times tables, for every value between 1 and 12. Names: inner and outer loop Because the loop over n is inside the loop over timesTableNo, the n loop would often be called the inner loop, and the timesTableNo loop the outer loop. Next... On the next page, we look at if statements, which allow our program to take decisions or check conditions.
| ||||||||||||||
| Java programming : variables | Tutorial Posted: 15 Mar 2012 06:07 PM PDT In pretty much any programming language, a very important idea to understand right from the are variables. A variable is essentially a value that has a name attached to it. The value of a variable can generallly be changed during the program, and the current value of the variable at any point is referred to via the variable's name. So what are variables used for? Well, pretty much anything and everything. But as an example, let's imagine we're writing a poker game. During the game, we need to keep track of various things such as the amount of money or chips that the players have left, the number of cards still in the deck, the amount of money that has been bet so far etc. We'll also need to keep a record or count of various things temporarily. For example, in our routine to pick five random cards for a player's hand, we need a variable that counts up to five. Declaring a variableThe first stage in using a variable is declaring it. This basically means saying to Java "I want to create a new variable called x". For example, we might create a variable to keep track of the number of cards in the deck by declaring a variable as follows:If you imagine the computer memory as a big set of pigeon holes, this line effectively asks Java to pick a free pigeon hole and label the word "noCardsInDeck" to it, and then put a note inside with the number 52 written on it. At any future point in time, we can read the variable— have a look at the value of the note currently in that pigeon hole— or we can write to it— replace the note with a new note, with some different value on it. Notice from this example a couple of features of variable declaration:
In general, a variable name should be something clear and representative, and follow certain conventions. On a separate page, we discuss Java variable name conventions in more detail; but for now, it will suffice to bear in mind this example. Using the variableSo now we've told Java that we want to keep a variable called noCardsInDeck, what can we do with it? Well, any time we want to read its current value, we generally just refer to it by name. For example, here is a line of code that will print out a message with the current number stored in this variable: For now, we won't worry about what exactly System.out.println means, but compare it to the line of code that you wrote in the getting started with Java guide. Notice also that lines of Java code generally end in a semicolon (;). If we want to set a new value for this variable, we can make a line of code that consists of the variable name, then an equals sign (=), then the new value: noCardsInDeck = 48; Note that this time, we don't write int, because we're not declaring the variable (in other words, we're not "mentioning it for the first time"). If we want to give the variable a new value based on its current value, then we can include a calculation, such as the following, which will subtract one from the number of available cards: noCardsInDeck = noCardsInDeck - 1; For subtracting or adding one, there is also a kind of shorthand that we can write. The following will decrement the variable, i.e. subtract one from it: noCardsInDeck--; while the following will increment or add one to it: noCardsInDeck++; If we want to subtract five, then either of the following lines will work (again, the second version is essentially a shorthand for the first): noCardsInDeck = noCardsInDeck - 5; noCardsInDeck -= 5; And assuming you have two variables defined, say, as follows: int noSuits = 4; int noCardsPerSuit = 13; then you can write: noCardsInDeck = noSuits * noCardsPerSuit; Here, the multiplication symbol is the star that you get by pressing SHIFT and 8 on many US/American keyboard layouts, or that you'll find on your numeric keypad if you have one. You can't use a lower case x, for example. Next: control flow On the next pages, we look at some ways in which the flow of a program is controlled: the for loop, which effectively allows us to repeat a section of code while a given variable moves over a particular range, and the if statement which lets us test a condition or make "decisions" in our program.
| ||||||||||||||
| Adding your first line of Java code | Tutorial Posted: 15 Mar 2012 06:00 PM PDT 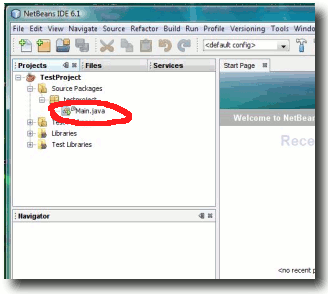 If you double-click on Main.java, the right-hand side of the screen will change to show the actual program. Instead of providing us with a file that is literally blank, NetBeans actually helps us by providing a "skeleton" program that we can add to. Initially, it should look something like this: 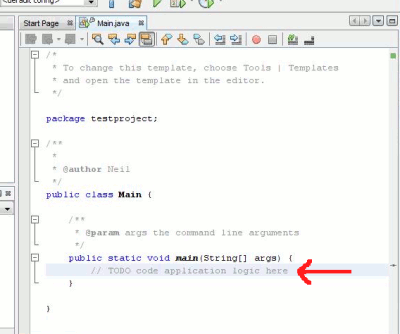 This may look slightly complicated, until you consider that the parts in grey are just comments (basically, notes that the programmer adds to help him/herself and fellow programmers) and are actually ignored by Java. So our skeleton program is really just three lines and a bit of formatting (the curly braces { and } ). For now, we're going to ignore the meaning of these lines and just add a line of program to what's already there. Locate the line starting with // TODO (indicated by the red arrow in the screenshot above). We're going to insert a line of Java code at this point. You can either add the line instead of the // TODO line, or else add the line below. Remember that the line is just a comment, so if you leave it in, Java will ignore it. But equally, Java won't care if you remove it. In the illustration below, we'll actually remove the comment. In traditional fashion, we're going to add a line to the program so that when run, it prints the message Hello, world!. The line we're going to place instead of the comment is the following: System.out.println("Hello, world!"); If you're new to programming, a key thing to bear in mind is that punctuation details matter. So the dots, brackets, quotes and semicolon must be in the right place. Spaces don't generally matter, but for reasons we'll see as we go along, it makes the program easier to read if you indent the line by a couple of spaces. You should end up with something looking something as follows (to save space, we omit parts of the program above and below in this next screenshot): 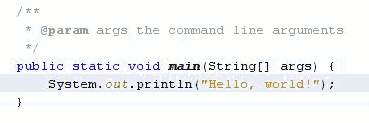 Notice how, as you type, NetBeans adds colouring automatically to the program. This colouring is called syntax highlighting. As you learn more about Java, you'll see that syntax highlighting helps you to read and spot mistakes in your program. Running the program If you've typed the line exactly as shown, then you're ready to run the program. Click the green arrow at the top of the window to run the program. If you've typed everything correctly, then you should see something like the following appear at the bottom of the screen: 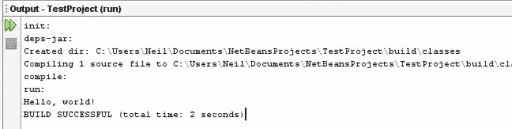 You'll see that our Hello, World! message appears in and amongst various "administration" messages. Of course, this wouldn't be a very user-friendly way of displaying a message to the user, and as you progress with Java, you'll learn about how to build "proper" user interfaces. But for now, be happy that you've entered a line of Java program, run it, and seen the result, however uninspiring that result might seem for now! Next: learning to program in Java Now you've run your first Java program, you're ready to actually start learning Java and hopefully do some more interesting things than just printing Hello World to the screen.
| ||||||||||||||
| Getting started with Java in NetBeans | Tutorial Posted: 15 Mar 2012 05:59 PM PDT We assume that you've obtained a JDK and IDE for your machine: these are the things you need to get started programming Java. In this guide, we'll assume that you're using the NetBeans IDE, which simplifies certain aspects of getting started for absolute beginners. However, if you have chosen another IDE such as Eclipse, it shouldn't matter terribly. Much of the principles are the same, but some of the dialog boxes you will see in Eclipse have extra options which you can generally ignore for the time being. Creating your first project When working with an IDE, you don't generally stick bits of program willy-nilly all over your hard disk (which was definitely a possibility in the heyday of BASIC, for example). Instead, you tell your IDE to use a particular directory to store your projects in, and each of your projects (in effect, each application you write) has its own directory inside that "master" directory.
Selecting the New Project button or menu option will bring up the following dialog box. The purpose of this dialog is to select the Project Type. Make sure that Java Application is selected on the right and click Next. 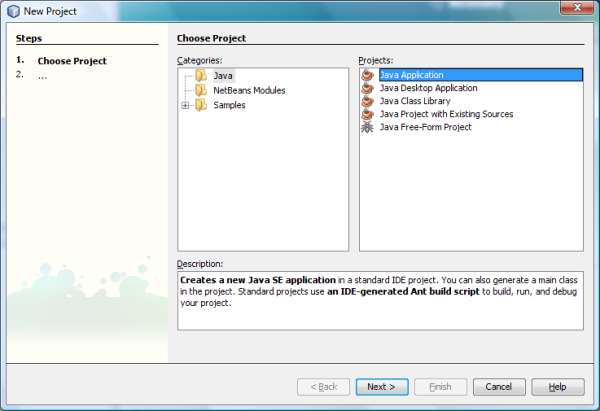 The next dialog to appear allows you to select the name and location for your project. I suggest you create a project called TestProject which you can use for 'playing about' with Java. (Even later on, it's often useful to have a test project for testing ideas, or for the occasional "throwaway" program.) 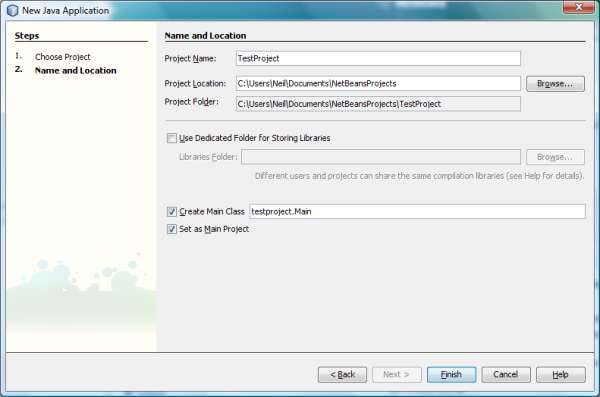 Below the project name field are two directory locations, which you may be able to leave as their default settings:
For your first project, you can leave the Create Main Class option as it is. Finally, click Finish. You will now be presented with a skeleton project. Next: adding your first line of code If all has gone well so far, you should now have a "blank" project ready to add your first line of Java code. On the next page, we look at writing your first line of Java code and running your first Java program.
| ||||||||||||||
| Java programming for beginners | Tutorial Posted: 15 Mar 2012 05:38 PM PDT The aim of this and the following pages is to teach you how to program Java, assuming you've done little or no programming in the past. Before you proceed with this tutorial, you should probably read through the guide to getting started with Java: that guide will tell you how to install the necessary software you need to program in Java. Especially if you're a complete beginner, you should make sure you've followed the getting started guide before starting on this tutorial, as it takes you through the mechanics of using the Java development tools. (An exception might be if you are working with a programming tutor who has taken you through these mechanics, or shown you a different tool than the one that we explain.) In this tutorial, we're going to concentrate mainly on the actual Java programming language, not on the mechanics of using the tools. As you read through the tutorial, you'll frequently see example program snippets. In general, you should try running them, and altering them slightly to see how your changes affect how they run. To see how to run them, see the page on running your first line of Java— you essentially follow this procedure, but insert several lines as necessary. Topics The topics currently covered in this tutorial are as follows. They're generally designed to be read in order and link on from one another:
| ||||||||||||||
| Getting started with Java | Tutorial Posted: 15 Mar 2012 05:54 PM PDT On this and the following pages, we'll look at how to get started with Java from scratch. Nowadays, part of learning to program involves learning the language itself, and a part of learning to program effectively also involves learning to use the programming tools, notably what is sometimes called the IDE (Integrated Development Environment). The following tutorial is thus split into:
What do you need to learn/program in Java? To program in Java using the standard programming tools that we'll look at here, it's much easier if you have a fairly "mainstream" computer: typically running Linux, Windows, Mac OS or Solaris. (Java programs can be run easily on many more platforms than this, but in practice it's easier if you develop on one of the common platforms as there are more tools available.) Other than a computer with a supported operating system and processor architecture, you will need to download the following:
Although the IDE isn't strictly necessary (you can compile and run Java from the command line), most people will find working with Java much easier if they use one. In the rest of this tutorial, we'll assume you're using an IDE, and part of the tutorial will be to explain the basics of using the IDE. Java Development Kit (JDK)Windows, Linux, Solaris For Windows, Linux and Solaris, the JDK is downloaded from the Java web site. At the time of writing, the JDK can be found as follows:
You'll have to select your particular platform and agree to the licence agreement. You may also wish to consider the option of Java SE Development Kit with NetBeans if it is available for your platform (see below). This gives you a JDK and an IDE all in one bundle. Mac OS On Mac OS X, the JDK is actually provided as part of Mac OS and there is no install required. However, it is recommended that you use the Mac OS system upate tool to update to the latest version (if a later version is available than the one you have). Integrated Development Environment (IDE) As mentioned on previous pages, the IDE provides you with a text editor specially designed for editing program code, plus a windowed environment to help you manage your projects, search through your code, remind you of parameters to methods etc. The NetBeans and Eclipse IDEs that we mention below are widely used and freely downloadable. Another option is JBuilder, a commercial IDE whose entry-level version is free of chrage. NetBeans A generally easy option is NetBeans, developed by Sun. If you are using Windows, Linux or Solaris, then NetBeans is available as an all-in-one package to install the JDK with NetBeans. To download NetBeans with the JDK, follow the instructions above, but select the option Java SE Development Kit with NetBeans. On Mac OS, where the JDK is provided pre-installed, you need to download NetBeans from the NetBeans web site. Eclipse Another good opction is the open source project Eclipse. To use eclipse, first download and install the JDK for your platform (on Mac OS, just use the system update tool to make sure you have the latest version). Eclipse is then a separate standard install. Which Java IDE should I use? The truth is that for normal programming, there isn't a huge amount to choose between the main IDEs. Some programmers prefer specific IDEs because of specific options that they provide, or because of particular tasks that their favourite IDE allows them to do easily. If your friends/colleagues/workplace use a particular IDE (and it's free), then you may as well use that same IDE. Otherwise, I would suggest starting with NetBeans (I believe its default setup is ever so slightly easier for the beginner), and then down the line when you have a feel for the language, try one of the other options such as Eclipse and see if you prefer it. For most users, there is probably no benefit in paying for a commercial IDE unless you are absolutely convinced that you are paying for a feature that you need and that isn't available in one of the free alternatives. Some of the IDE-related examples and illustrations in this tutorial are based on NetBeans. But many of the principles are transferrable to other IDEs: they generally operate similarly. Getting started with the IDE On the next page, we'll look at the first steps with NetBeans: getting started with your first Java project.
| ||||||||||||||
| Posted: 15 Mar 2012 10:30 AM PDT  BluRay 720p MKV")
Tags: THE MUPPETS,the muppets,the muppets 2011,the muppets trailer,the muppets soundtrack,the muppets dvd release date,the muppets review,the muppets wiki,the muppets characters,the muppets take manhattan,the muppets christmas carol
|

.jpg)


_m.jpg)
| You are subscribed to email updates from Lappy Zones To stop receiving these emails, you may unsubscribe now. | Email delivery powered by Google |
| Google Inc., 20 West Kinzie, Chicago IL USA 60610 | |
{ 0 comments... Views All / Send Comment! }
Post a Comment